When you mention “fashion design,” many envision someone clad in all black, perhaps sporting artsy round glasses and a high turtleneck, sketching stunning yet somewhat impractical fashion illustrations in their perfectly disheveled studio.
However, the reality for most fashion designers is far from that, especially those of us who are freelancers. Instead of that picturesque scene, our sketching process probably involves sitting at a cluttered kitchen table, meticulously crafting detailed fashion flat CADs in Adobe Illustrator.
Adobe Illustrator has firmly established itself as the industry standard for CAD drawings in the fashion design realm. It’s rare to come across a fashion design job listing that doesn’t require proficiency in Adobe Illustrator. In fact, I’d venture to say such a job doesn’t exist! Ok, maybe that’s dramatic…
While Illustrator empowers us with tools to create proportionate and detailed sketches of our designs, the process can be time-consuming. Especially for freelancers juggling multiple projects, churning out a month’s worth of sketches within days can feel like an uphill battle.
To tackle these challenges and keep turnaround times short, leveraging powerful Adobe Illustrator keyboard shortcuts is essential.

The Frustration of Manual Tasks
Having worked across various design teams, I’ve observed how others use Illustrator—an experience that’s both enlightening and occasionally exasperating.
Ever stood behind someone else using a computer and watched them do a task in the slowest possible way? It sometimes makes me want to poke my eyeballs out… (maybe I’m impatient?!).
I’ve watched people take time to look for the tool they need in the toolbar by hovering over each icon before selecting the desired tool.
Use Illustrator hotkeys to switch tools!
I’ve also seen people manually draw a trim for a garment and laboriously copy and paste along a path.
Create a brush for trims!
Or my fav- sketching one half of the garment, copying and pasting it and then reflecting that half, moving it to meet the other half, and… oh my gosh I’m slightly bored even writing that out! There’s no need to do each of these steps individually when you can do them all at once with a keyboard shortcut.
Efficiency, baby!
I’ve never quite managed a polite and helpful way to tell someone in person that there is any easier way to do [insert any Illustrator task here], without sounding like a big ol’ know-it-all.
Which is why I’ve written this post. I want to help others speed up Illustrator fashion sketches! (Feel the same? Share the handy Illustrator shortcuts for fashion designers cheatsheet with anyone who you would like to nicely nudge into a quicker Illustrator workflow).

Top Illustrator Shortcuts Every Fashion Designer Should Know
**Cue the angels singing**
Illustrator keyboard shortcuts make me happy to my core. There are some so satisfying that I unknowingly smile when I complete a task with a certain shortcut. Look, I might have a problem… But I love Illustrator!
It might not seem like a huge time saving by shaving off a few seconds here and there, but when you are spending 8 hours a day in Illustrator, those seconds add up!
At Tech Pack Wizard, we are all about fewer clicks to achieve the same outcome. This is something I’m constantly reminding the development team about as the plugin is being created.
Fewer clicks means a faster workflow!
Top Adobe Illustrator hotkeys Every Fashion Designer Should Know
Here is a curated list of Illustrator quick keys I use daily as a fashion designer.
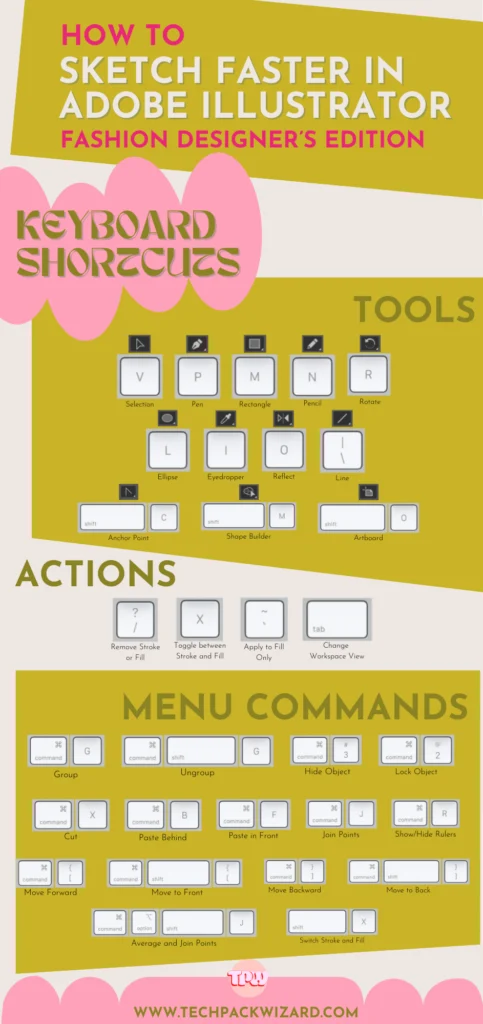
Tools
• V
Selection tool: This is the black arrow; your main selection tool. When you click on an object or a group with the black arrow, it will select the entire object or group.
• A
Direct selection tool: This is the white arrow. It lets you select anchor points and paths of a group or object instead of the entire group/object.
• P
Pen tool: Your best friend! This tool is probably what you’re most familiar with from sketching. Easy as point and click!
• N
Pencil tool: Mimicking more of an IRL drawing tool, the pencil tool draws a line as you hold the mouse down and drag, the way a pencil would on paper.
• M
Rectangle tool: Use it for creating simple shapes or the frame for a clipping mask.
• L
Ellipse tool: Circles are almost always a necessity for things like buttons.
• \
Line tool: Click and drag to create a straight line. For when you can’t be bothered with the pen tool.
• O
Reflect tool: Reflect an object or copy it to duplicate a mirrored image.
*Pro tip: After selecting the reflect tool (O), hold alt and click where you want the object to be reflected across. This brings up the Reflect panel where you can adjust how the object is reflected.
• I
Eyedropper tool: This tool will apply the fill and stroke colors and settings to the selected object or path.
*Pro tip: hold Shift while selecting a color with the eyedropper tool and it will grab the color only for either the stroke or fill (whichever you have activated) and not apply all other properties from the source object, such as stroke weight.
• R
Rotate tool: Once you have the rotate tool selected, right click where you want to place your pivot point or hold alt and right click to bring up the pop-up panel and rotate by a precise degree around your selected pivot point.
• Shift + M
Shape builder tool: Combine overlapping shapes easily. Selected desired objects, press Shift + M, and drag mouse through shapes to combine.
*Pro tip: hold the alt key to remove unwanted parts.
• Shift + C
Anchor point tool: This tool will allow you to click and drag on anchor points to change the curve or click once to convert to a corner. You can also click and drag on a line to create a curve.
• Shift + O
Artboard tool: With the artboard tool you can move, resize, and rename your artboards.
Actions
• ~
Apply changes to fill only: To make your sketches look more realistic, you can change the angle of pattern fills in the sleeves without rotating the whole sleeve by holding the ~ key while rotating the selected object.
• X
Toggle between stroke and fill: If the fill color is selected, press x to activate the stroke and vice versa.
• Tab
Changes view of workspace: Removes all toolbars from your workspace for a minimalist layout.
• /
Remove stroke/fill: Removes the color from either the stroke or fill, whichever is selected at the time.
Commands
• Shift + X
Swap stroke & fill colors: Switch your fill color to your stroke color and vice versa with a quick key command.
• Cmd + F
Place in front: Place copied object in front.
• Cmd + B
Place in back: Place copied object in back.
• Cmd + X
Cut object: Remove object and copy to clipboard.
• Cmd + R
Show or hide rulers: Toggle the rulers on or off.
• Cmd + G
Group objects: Group all selected objects.
• Cmd + Shift + G
Ungroup objects: Ungroup all selected objects.
• Cmd + [
Move backwards: Move selected object backward.
• Cmd + ]
Move forwards: Move selected object forward.
• Cmd + Shift + [
Move to back: Move selected object to the very back.
• Cmd + Shift + ]
Move to front: Move selected object to the very front.
• Cmd + 2
Locks object: Lock selected object. Locked objects cannot be selected, moved or edited. Unlock from within the Layers panel.
• Cmd + 3
Hides object: Turns off visibility of object in Layers panel.
• Cmd + Alt + Shift + j
Average and Join Points: Averages and joins two points from separate paths in one move.
• Cmd + j
Join Points: Joins two points from separate paths. Creates a straight line between the two points to join them together.
Bonus Shortcuts:
• Command
Select object: Press and hold command while clicking to select a new object while keeping the current tool selected.
• Space Bar
Hand Tool: Press and hold the space bar to temporarily activate the hand tool and pan around the screen with your mouse without deselecting the current tool you’re using.